
As advancements in dentistry evolve, one area that has made significant strides is the development of overdentures. Overdentures, especially implant-supported ones, are an effective solution for patients who have lost multiple or all of their teeth. These dentures provide enhanced stability, comfort, and functionality compared to traditional dentures. For a dental clinic like Dental Villa, which prides itself on offering state-of-the-art care, providing patients with comprehensive information about treatments like implant overdentures is essential.
In this blog, we’ll walk through the procedural steps involved in getting implant overdentures and the clinical protocol dentists follow to ensure successful outcomes. Whether you’re a patient considering this option or a dental professional seeking to refine your understanding, this guide will cover everything you need to know.
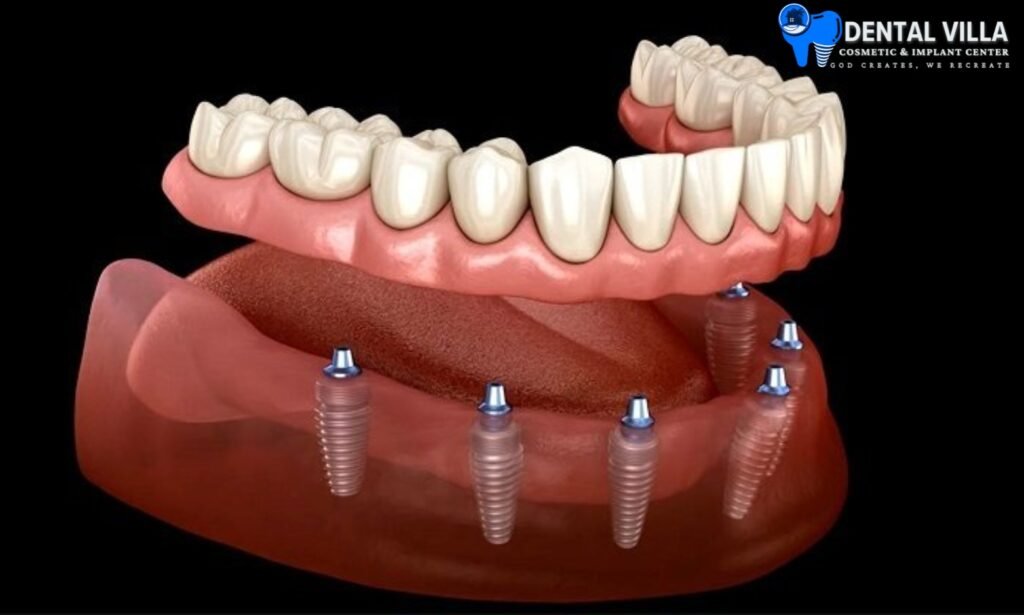
What Are Implant Overdentures?
Implant overdentures are a type of denture that is anchored to dental implants placed in the jawbone. Unlike conventional dentures that sit on the gums, these overdentures attach to implants, giving them enhanced stability and eliminating the need for adhesive materials. Implant overdentures can be either removable or fixed, depending on the patient’s needs and preferences. They are especially suitable for individuals who have lost all or most of their teeth but still retain enough bone density to support the implants.
Benefits of Implant Overdentures:
- Enhanced stability and comfort
- Improved chewing and biting efficiency
- Better speech clarity
- Preservation of jawbone integrity
- Long-term solution with minimal maintenance
Steps Involved in the Implant Overdenture Procedure
The process of getting implant overdentures involves multiple steps, each crucial to ensuring optimal results. The journey starts with an initial consultation and ends with follow-up care to ensure patient comfort and satisfaction.
Step 1: Initial Consultation and Examination
The journey toward implant overdentures begins with a comprehensive consultation. During this phase, your dentist will:
- Review your medical and dental history
- Conduct a thorough examination of your oral cavity
- Take X-rays or perform a 3D scan (CT) to evaluate bone density and the overall condition of the jawbone
- Discuss your treatment options, including the types of overdentures (implant-supported vs. tooth-supported)
- Determine if additional treatments such as bone grafting or gum treatment are needed
At Dental Villa, our expert team ensures that all factors are carefully considered before recommending the best course of action for implant placement.
Step 2: Bone Grafting (if necessary)
If it’s determined that you don’t have sufficient bone density to support the dental implants, a bone graft may be necessary. This procedure involves placing additional bone (either synthetic or from a donor site) into the jaw to provide a stable foundation for the implants.
Bone grafting typically adds a few months to the overall treatment timeline, as the bone must heal and integrate with the existing jawbone before proceeding with implant placement.
Step 3: Implant Placement Surgery
Once it has been confirmed that your jawbone can support dental implants, the next step is to surgically place the implants into the jawbone. Here’s how this step is typically carried out:
- Local Anesthesia: The procedure is usually performed under local anesthesia, ensuring that the patient is comfortable and pain-free.
- Incisions: The dentist makes small incisions in the gum tissue to expose the underlying bone.
- Drilling Holes: Precise holes are drilled into the jawbone to accommodate the dental implants.
- Placement of Implants: Titanium implants are then inserted into the prepared holes. The number of implants varies depending on the type of overdenture being used, but typically 4 to 6 implants are placed in each arch.
- Stitching: The gum tissue is then stitched back together, covering the implants.
At this point, the implants need to integrate with the bone, a process called osseointegration. This usually takes around 3 to 6 months. During this period, patients may wear a temporary denture while their gums heal.
Step 4: Abutment Placement
Once the implants have successfully fused with the bone, the next step is placing the abutments. Abutments are small metal posts that protrude through the gum tissue and act as connectors between the implant and the overdenture.
- Incisions: Small incisions are made to expose the tops of the implants.
- Abutment Placement: The abutments are then attached to the implants. They will serve as the anchor points for the overdentures.
- Healing Time: Patients usually need a couple of weeks to allow their gums to heal around the abutments before moving on to the next step.
Step 5: Impression Taking
After the gums have healed around the abutments, the dentist will take impressions of your mouth. These impressions are crucial for creating custom-made overdentures that fit perfectly.
- Custom Trays: Dentists use custom impression trays to capture the precise contours of your mouth.
- Elastomeric Materials: The impressions are made using elastomeric materials to ensure accuracy.
- Lab Work: The impressions are then sent to a dental laboratory, where your overdentures will be crafted.
Step 6: Try-in of the Provisional Set-up
Before the final overdentures are made, a provisional or trial set of dentures is created. This step allows for adjustments in bite alignment, vertical dimension of occlusion, and aesthetics.
- Teeth Alignment: The provisional dentures are fitted onto the abutments, and the dentist evaluates the alignment of the teeth and bite.
- Aesthetic Check: The dentist and patient assess the appearance, ensuring that the smile line and lip support are appropriate.
- Functional Check: Speech, chewing efficiency, and comfort are tested, and any necessary adjustments are made.
This stage is vital for ensuring patient satisfaction and optimal functional outcomes.
Step 7: Final Overdenture Placement
Once the provisional dentures are adjusted to your satisfaction, the final overdentures are created. At this stage:
- Attachment: The final overdentures are attached to the abutments using either stud attachments (ball-retained) or bar-retained systems, depending on the treatment plan.
- Final Adjustments: The dentist will make any final adjustments to ensure the perfect fit and alignment of the overdentures.
The final overdenture should fit snugly, providing stability, comfort, and a natural-looking smile.
Step 8: Post-Placement Evaluation and Follow-up
After the overdentures have been placed, follow-up visits are necessary to ensure everything is functioning as expected.
- Comfort Check: The dentist checks for any discomfort or sore spots.
- Bite Adjustment: If necessary, minor adjustments to the bite can be made.
- Oral Hygiene Instructions: You’ll receive instructions on how to care for your new overdentures, including cleaning techniques and how to maintain oral health.

Clinical Protocol for Implant Overdentures
For successful oral rehabilitation with implant overdentures, adhering to a clinical protocol is essential. This protocol ensures that the patient receives the highest standard of care, reducing the risk of complications and increasing the success rate of the procedure.
1. Pre-Surgical Assessment:
- Complete medical and dental history review
- 3D imaging and X-rays to evaluate bone density
- Identifying if bone grafting or other preparatory treatments are needed
2. Surgical Guidelines:
- Accurate placement of implants in optimal locations for maximum stability
- Adequate healing time between implant placement and overdenture attachment
- Use of abutments suited for the patient’s individual anatomy
3. Prosthetic Management:
- Custom impression taking to ensure perfect fit
- Trying in provisional setups to refine fit, function, and aesthetics
- Detailed check for proper occlusion, bite force distribution, and functional ease
4. Post-Placement Care:
- Regular follow-ups to monitor comfort and function
- Maintenance of oral hygiene with proper cleaning of implants, abutments, and overdentures
- Annual checks to assess the condition of the implants and overdenture attachments
Conclusion
Implant overdentures offer a life-changing solution for individuals who have lost several or all of their teeth. With a well-planned treatment protocol and careful clinical steps, patients can enjoy improved oral function, enhanced aesthetics, and long-lasting results. Dental Villa is committed to providing exceptional care, guiding patients through each phase of the overdenture process.
If you’re considering implant overdentures, don’t hesitate to book a consultation with our experienced team at Dental Villa. We are here to ensure that your journey to a healthier, more functional smile is smooth and successful.
